Using photographs in our research
As geoscientists, we are trained to observe and record the world around us. We often use but simple tools – a note book, a hammer, a camera, maybe a handheld GPS. With these implements, we can make careful observations and deductions about the evolution of the landscape around us.
The camera is one of the most important tools at our disposal. When supported by careful mapping, field sketches and notations, photographs can help unravel the processes that shaped the landscape around us, both now and in the past. Any student of geoscience, be it A-Level, undergraduate, postgraduate or professional, needs to use photographs of key landforms and features to illustrate the story that they wish to tell. Photographs provide part of the evidence that we use when presenting our arguments, and should form a key part of any field-based dissertation. More than that, photographs illustrate our talks, posters and walls, and taking good pictures of beautiful landscapes is rewarding in its own right.
I am no expert in photography. I have, however, learned a few tips and tricks of the trade from far better photographers, such as Iain Rudkin and Michael Hambrey. For some examples of great photographs, see the ones from Iain Rudkin from his time at Rothera from 2009-2012.
Principals of good landscape photographs
You don’t need a state-of-the art camera to take good photos (although, I won’t lie, it does help). More important than filters, lenses and tripods is your eye. There are a few simple rules that you can use to help you to create aesthetically pleasing landscape photographs.
Firstly, use the Rule of Thirds. Composing your photograph so that it is divided into thirds is more aesthetically pleasing. Many cameras have a ‘landscape mode’ that puts a grid on the screen to help you compose your photographs. A big mistake is to have the horizon line dissecting your screen, right across the middle. Try pointing the camera up or down a little more, and have the horizon along the top or bottom third.
Secondly, have Depth of Field. Use something in the foreground to give your image depth of field. If you can, placing it at the bottom left or right corner, where the grid lines intersect (following the rule of thirds), is even more pleasant to look at. A feature of human interest is always good, but it could be a rock, or tree, a landform…
Thirdly, Lead the Eye In. Compose your photograph so that the eye is naturally drawn into the centre of the photograph. Use features in the landscape, such as a curve of a river or a shoreline, to draw the eye into the centre. Features that lead the eye out of the photograph are less pleasing; for this reason, if photographing people, have them looking into, not out of the photograph.
Those are the three Golden Rules that help a good landscape photograph become an excellent landscape photograph. In the gallery below, I show how I have attempted to use these rules while on fieldwork on South Island, New Zealand recently.


A number of subsidiary things to think about include:
- Don’t forget about your shadow. Having your shadow in the picture can spoil a good photograph. Move yourself out of the way.
- Good photographs have drama. A great way to have drama is with the weather; low lying mist, fantastic clouds, flurries of snow – all these can add interest and appeal to your picture.
- Move yourself. Shift your perspective until you can get something that satisfies the Three Golden Rules.
- Have patience. Getting the right shot can mean spending an hour fiddling with your position and the settings on your camera (although, in general, I just go with ‘Auto’ or the preset functions – I think my camera is cleverer at working things out than I am!).
- Try unusual angles and closeups. Get on your hands and knees, or stand up high.
- Using a tripod will improve your photographs, particularly in low-light conditions. However, they can be tedious to carry around, particularly when you’ve got a rucksack full of rock samples to contend with as well. Some people swear by the lightweight Gorilla Pods, but they’ll only work if you’re in a landscape with plenty of fences and things to attach them to. Others use an adapted walking pole with a scew in the top as a Monopod to reduce some of the camera shake. Personally, when I’m working, I don’t want to fuss about with a tripod, but if you’re making a special trip to take photographs, it’s probably worth it.
Here are some beautiful photographs of the Dry Valleys in Antarctica by Michael Hambrey. See how he has used the Three Golden Rules to great effect.


Photography for Geoscientists
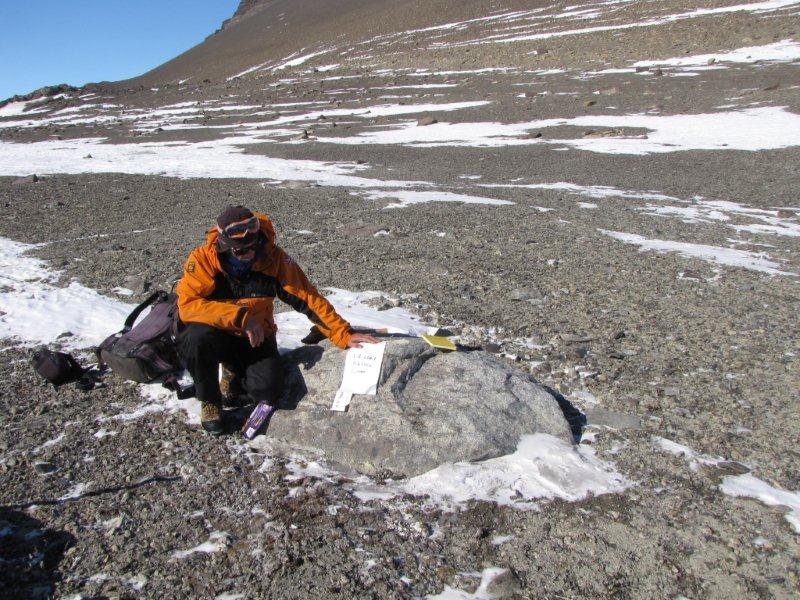
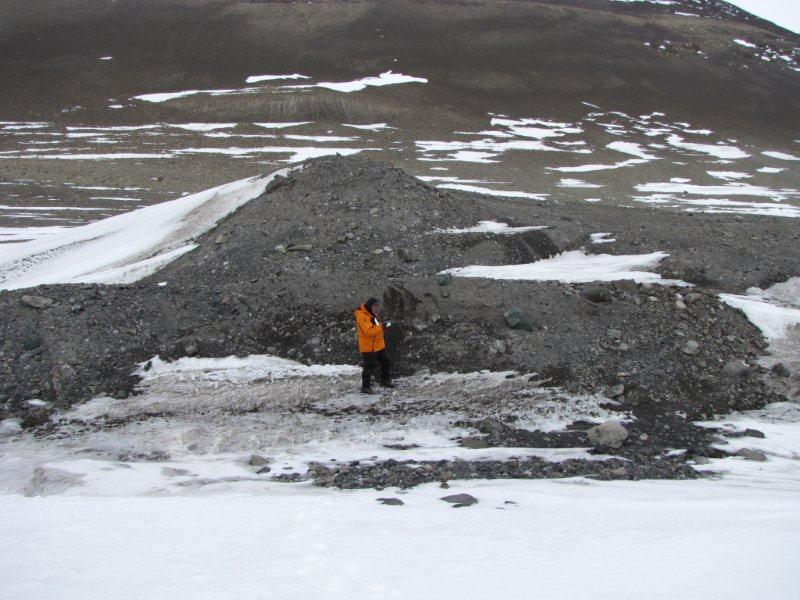
Of course, you’re not just out for a walk. You’re a geoscientist taking photographs to illustrate your work. There are some additional rules to think about, and the number one rule is: Scale. All ‘work’ photographs need a human element in them to give scale, or the great section you’re photographing is meaningless. For larger items have a person stand on it, or in it, to give a sense of the size of the landform you’re photographing. Smaller landforms should have a scale in too. Try and always the same, one which you’re likely to be carrying around with you. I usually use either a camera lens cap or pencil (for small things) or a geological trowel or notebook for slightly larger items. That way, your photograph has a lot more meaning.
In the gallery below, you can see some of these techniques, including using scale, have been applied during fieldwork in Antarctica.


Post-processing landscape photographs
Don’t be afraid to fiddle with your photograph after you’ve taken it. There are loads of simple photograph processing tools available, ranging from the hugely powerful PaintShopPro and Photoshop to simple tools that come free with Windows or Mac operating systems. Some things to try include:
- If you couldn’t get the Rule of Thirds at the time, no worry – crop away until you have it later.
- Straighten the horizon. Nothing looks worse than a wonky sea or lake.
- Remove those red eyes in the subjects of your photographs.
Most important of all, critique your photographs. Think about what makes them good and bad. With practise, you’ll get better – an eye for composition can be learned, and it’s a rewarding skill to have. I’m learning and improving all the time, and I hope that these hints and tips will be useful to you.
Do you have a photography hint or tip to share? Please leave a comment and share ideas with everyone.